

Volume rendering of neuroimaging data with Python and VTK

Pictures of neuroimaging data are incredibly compelling, but creating those images can be a challenge. While many tools are available, none of them are ideal for easily creating lots of images. I decided to explore whether my favorite programming language (Python) could be used to quickly create many images of brain data.
If this is interesting, please continue reading. Or if you'd like to get the demonstration scripts right now, head to the repository.
Background: what's volume rendering?
Specifically, I wanted to be able to perform volume rendering of large batches of neuroimaging data. Volume rendering is the process of creating a 2D image of 3D (or really n-dimensional) data. It's very hard to do correctly, but fortunately smart people have done a lot of the difficult work already. This means that complex multidimensional data can be turned into human-interpretable 2D images with relatively little effort.
VTK is a sophisticated visualization toolkit (get it?) that supports rendering of 3D scenes including volume rendering (among many other functions). It also plays nicely with Python, meaning that you can use VTK's functionality while scripting in a high-level language. This was ideal for me, so I worked up a demonstration project.
VTK is very powerful and — even with excellent Python support — quite different from any programming interface that I'd ever used. Critically, some of the most challenging tasks related to volume rendering with VTK had already been worked out by Adamos Kyriakou which he laid out beautifully in a post on his PyScience blog. Adamos's simple approach and clear explanations made my work here tractable. For an introduction to rendering brain data with Python, check out his stuff.
While rendering a brain volume with VTK was clearly possible, my goal was a bit more complex than single-volume rendering. Technically, I wanted to blend multiple volumes together. This meant overlaying colors representing one set of numbers (e.g., brain activation) on colors representing another set of numbers (e.g., brain structure). You see images of this kind frequently in neuroscience journals and even the popular press, but often the images aren't made with what I would consider true volume rendering, instead using surface rendering (a separate topic that I won't get into here).
After investing a bit of time learning about VTK, I was able to produce some decent images. I go into more detail about how this was accomplished in the repository's README. Here are a pair of examples:

First, a synthetic lesion. This shows the extent of damage that might follow a bad middle cerebral artery stroke superimposed on a healthy template brain.
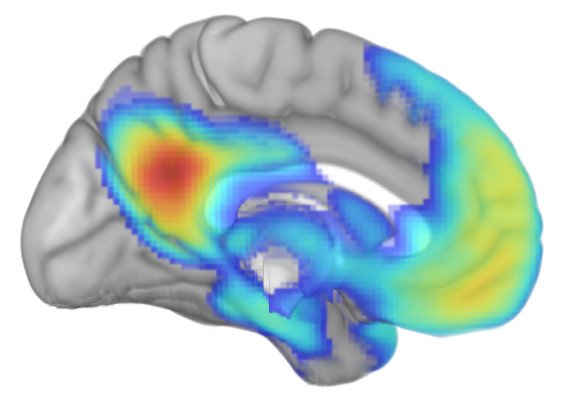
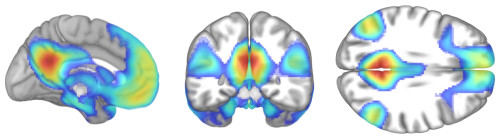
Second, some resting-state functional connectivity data. Using the same template as a base, I've superimposed functional connectivity of the default mode network (DMN) seeded from the posterior cingulate/precuneus region.
These images are attractive and informative, but they aren't novel in and of themselves. Similar images can be generated manually using GUI-driven applications; some of these can even be scripted to batch-render images. However, the means by which these images were generated, and the potential ease with which large numbers of similar images could be generated, appears to be novel. The scripts and comments in the README file included with the repository lay out the approach(es) that I took, so I'll close this post with broader comments about rationale, some hurdles to clear, and what I'd like to provide soon.
Rationale: why volume rendering?
Brain images can be generated using many different techniques, some of which are much simpler and more straightforward than volume rendering. Why bother? Some reasons:
- Clipping: Rendering volumes lets you clip the volume to suit your needs, slicing it where you want to show a given effect. Here are a few examples showing the results of clipping a solid volume with different planes.
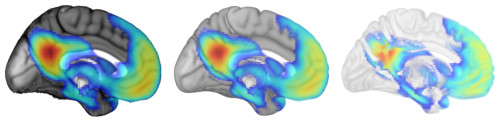
- Opacity: Rendering volumes also lets you decide what values are opaque, translucent, and transparent. Here are examples that make CSF more visible than usual, a typical rendering, and one that makes gray matter more translucent.
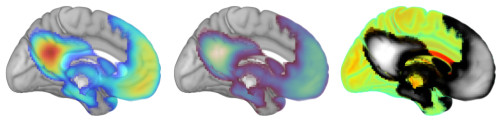
- Color: Similarly, you get to decide how values correspond to colors. Here are examples of rendering the same template and activation map using different color palettes.
The intersection of these advantages makes volume rendering of brain data (or any data) very appealing.
Outstanding issues
Overall, I was very impressed with the images rendering using VTK and Python, but there were certainly some frustrations.
First, you can't render multiple overlapping translucent volumes in VTK at the moment. This prompted the current approach of mixing template and overlay images instead. It works, but it's a bit clunky and slow. A native VTK solution for blending two or more volumes would be terrific.
Second, the VTK renderer that I used couldn't produce images in an off-screen window. This is a minor annoyance, but it would be nice to have images be saved directly to disk instead of flashing by on the desktop during the rendering process.
Third, I'm a novice VTK user. I ended up using Numpy to work with arrays of data, then saving the results back out to NIFTI formatted data files, then loading those using VTK. This is slower and certainly less elegant that doing more data manipulation with native VTK calls. Suggestions for improvements would be welcome!
What's next?
I'd like to build this approach out into a simple, functional tool that can batch-render images combining a template volume with an overlay. There are complexities that will need to be overcome, but this approach serves my immediate needs and I'd very much like to pass it along to others. If you think that you'd use such a tool, do please let me know.